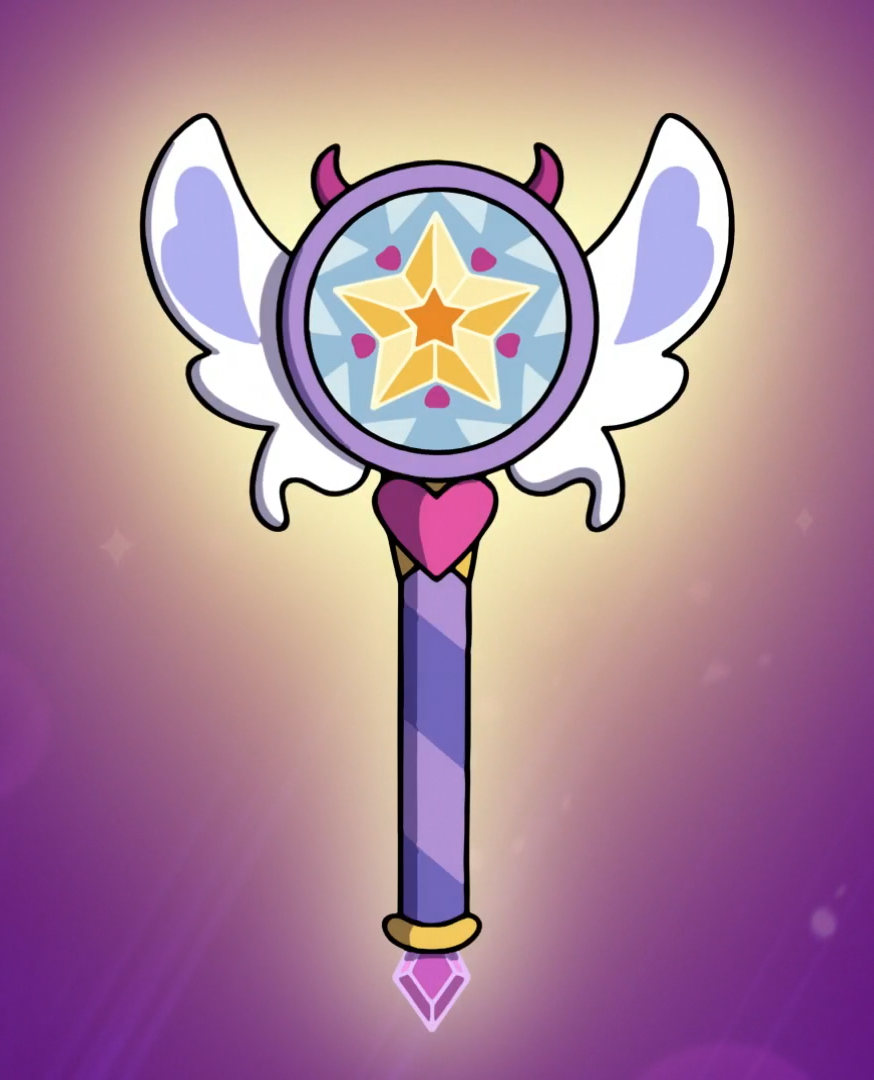
Eclipsa’s Wand Tutorial
| Supplies Needed | Tools Needed |
Umbrella
Duct Tape
Stock Paper
EVA Foam (Different Sizes and Thickness)
Thin wood
LED Battery Operated Light Set
Clear Ornament Balls (Different Sizes)
BARGE Cement Glue
Purple/Black Lace Ribbon
Crayola Hardening Clay
Paints (Assorted Colors: Black, Purples, White)
Wood Glue
Diamond Ring Shot Glasses | Soldering Iron
Glue Gun
Paint Brushes
Dremel (With numerous attachments)
Sander / Sanding Paper
Box Cutter / Exacto Knife
Safety Glasses
Face Mask |
Step 1 – Larger Ornament
Order, or pick up all the supplies needed! Personally, I found everything on Amazon and ordered a bunch of Clear Ornaments assorted sizes to work with. Eclipsa’s wand has 2 balls at the top, one inside one another. For me, I liked using the ornaments because you can open them and use them to house the wires and electronic pieces if you choose to have your wand light up. This also makes it easy to change out the batteries or lights when needed. You will need to use the soldering iron to melt off the hanging part of the plastic ornaments. Make sure you use a mask as melting plastic is toxic!
I found that using wood glue helps the final paint to attach and not peel the projects, and I painted the inside of one of the ornament halves. I painted the entire piece, so you can’t see the wires when completed. I used a light pastel purple, so the lights would have a purple effect when lit. You may need a couple of layers and will need to sand when you have it looking the way you like.
Let the layers dry before you add more, otherwise, it will start to look blotchy. Once you have it the way you want it, you can paint the outside. Proceed to paint it black to blend with the umbrella itself. Once they are dry you can put them aside to work on the next pieces.
Step 2 – The Wings
Start by drawing out the wings. You can free-hand them, or try to print out a picture and trace them, and use a box cutter to cut out the pieces. Make sure you have nice clean edges, as these will be the final piece. Sanding them down is also a good option. I then traced my pattern onto the thin wood and cut them out with the Dremel. Then, I painted both wings black. Also, you can add a gloss when they dry if you want a shinier finish.
Step 3 – Inside the larger ornament
Using the EVA Foam, make a ring (think like Saturns planet ring), to fit around the smaller plastic ornament and painted this a pastel purple. Then paint the plastic ornament ball completely black, the LED lights will be housed behind this. Double check to ensure there are no blotchy spots, as they will shine through. Once everything is dried, I used my BARGE Cement Glue and attached the ring to the ball and set it aside.
Step 4 – Bottom of the Umbrella
Grab 2 of the shot glass diamond rings, and take them off the plastic ring piece. Grab 2 of the diamond cup bottoms, and sand them down. Paint a few layers of wood glue on them, and then sand them down until they are nice and smooth. While at Michaels Crafts, I was able to find some iridescent spray paint and painted them to give them a touch of bling.
Step 5 – Making Clay Pieces
Go ahead and grab the Crayola clay and start by making a small ball for the bottom of the umbrella handle, right above the jewel piece. Once you have the right size, set it aside for 24-48 hours until it hardens.
Now, start molding a crescent moon for the top of the umbrella. This will go directly on top of the larger ornament. Set this aside when you are happy with the size. Make sure they harden completely before painting them. This clay dries fairly quickly, and the pieces are super light as to not weigh you down.
Step 6 – Getting the pieces together
Here comes the part where you need all the patience in the world. Ensure all your pieces and paint are 100% dry. Connect the glue gun and start heating up the glue sticks.
Get the smaller ornament with the ring around it, and you will carefully use the soldering iron to melt a hole into the top and bottom so you can slide it onto the umbrella. When the correct size is made, use the hot glue gun to attach the ornament to the top of the umbrella.
Also, you will also need to solder the larger outside ornament the same and attach to the umbrella. This will create the illusion needed for her want. Do not attach both larger ornaments just yet, as you will need to place the lights and battery inside. For me personally, I was able to run my LED set below the ornament so I can replace the batteries once they die. (See below for reference). At this point, it is safe to glue the half moon piece on top of the larger ball.
Set the umbrella aside and let it dry.
Step 7 – Wrapping Up
Start by getting both the shot glass pieces and gluing them together with the umbrella pole in the middle. Holding the pieces for a few moments to ensure they don’t pop off or come loose may be needed.
Do the same with the smaller ball below the diamond piece and allow to dry. Lastly (optional), you can glue on the lace to the bottom part of the umbrella to add some features.
Estimated Cost: $45.00
Estimated Time to Complete Project: 11 hours
Your estimated cost may differ if you do not already own all the tools needed to complete this project.