I decided to make Khonshu’s costume from the Marvel series Moon Knight!


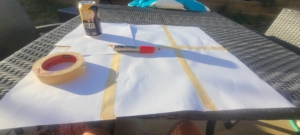
| Supplies Needed | Tools Needed |
|---|---|
| Fabric for Duster-Vest and skirt (I bought 5 yrds to be safe and have extra) Duct Tape (for patterns) Stock Paper (for your patterns) Crayola Modeling Clay Paints (Deep Gold, white and black) Glue Gun Sticks Plaster of Paris Foam 1.5" Foam 3" Strofoam Head Glass Head Morphe Suit Mask (black and needs to be see through) Lots of Gauze (amazon has them in bulk) Mummy base costume - (It runs small) Belts (Stretchy x2 ; in Bandage colored on Amazon) | Heavy long sewing needles (or sewing machine) Glue Gun Paint Brushes Box Cutter / Exacto Knife (Extra blades!) Safety Glasses Scissors Sewing pins 6 foot Pole/PVC Pipe Spray Paint (Slate/Grey/Oynx, Silver, Gold, and clear gloss) Resin Resin coloring (Black/Oynx, Maroon and Gold) Silicone mold of a Cresent Moon |
Debuted at: San Diego Comic-Con 2022
Step 1 – Making the Patterns
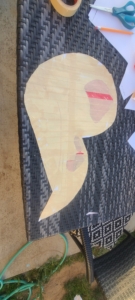
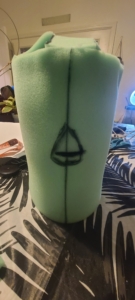
I used heavy paper to draw and cut out my patterns, for Khonshu’s skull / head.
Measuring your head from your chin to your forehead will give you an idea of how big the patterns need to be.
Also measure the circumfrance of your head for the base.
You will also need to make a pattern for a Vest Duster. I found this does not need to be perfect, as it is very worn out and tatterd. I found some fabric that had holes already and made my duster out of that. It was grey fabric, so I used “irvory” spray paint to make it look lighter, if you spray farther away it won’t make the fabric sticky or hard. 🙂
I will be selling the patterns soon, and links will be available here!
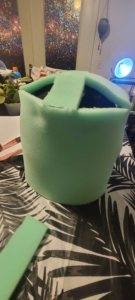
Step 2 – Making the Foam Base / Attaching the pattern to test
You will need to make a “bucket base” to build off of. I used the tutorial from xxForeverFaithxx on YouTube.
The only part I would change for Khonshu would be not gluing the lef/right side of base to the mask due to Khonshu’s large eye sockets.
Also make sure you cut eye and nose holes so you can breathe and be comfortable in the mask.
Once you have the bucket base created, attach your Khonshu patter to the mask using sewing pins to make sure everything fits properly.

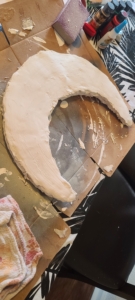
Step 3 – Cutting the 3″ Foam and attaching the Mask
Once you cut the final pieces, again use the pins to attach and test before you start gluing!
LET IT DRY, then try it on to see how everything looks/feels.
The mask above also failed. Used the same pattern, but used EVA Foam for the entire process and glued together. Once that was set used Modeling Foam all over the mask to smooth it out. It needs 24hr to set/dry, but then was able to paint the mask.
Step 4 – Adding layers to the mask for dimision
At this point you can add more defined cheekbones and eyebrows to make some defiintion and dimensions to the mask.
Step 5 – Start gluing the fabric to the mask in layers
Time to finish up gluing on any pieces to the mask!!!
Step 6 – Start adding expanding foam / Pouring resin
I added the expanding foam in layers. Once you spray it on, give it 3min, then you can start using your hands to manipulate the foam into the shapes you need/want.
Depending on what brand you use, it will need time to dry and set before you can start using a knife/blade to shape it better.
This will take some time, so prepare yourself! It’s also very messy, so make sure you do this in a well ventailated area!
While this was drying, I poured my resin into the mold so that would have time to set. I mixed a few resin colors to get this result.

When it was set and hardened, I used a rag with gold paint on it to smear around for more dimension.
Step 7 – Adding the Plaster of Paris
Time to add the final layer! This will help the paint adhere better to the mask. You can work in layers. I added 3 light layers to cover all imprefections.
I used 160 and 80 grit sand paper to sand it down once the plaster set.
Step 8 – Sanding down
This will also take A LOT of time! Using a sanding machine can help reduce some time, but smaller areas you will need to manually sand down.
Step 9 – Prep for painting
I used a moist paper towel to get off any leftover sanding, before I started to paint.
Make sure evreything is dry before you start painting the first layer!
Step 10 – Spraypaint the Staff/PVC Piece
I used a metallic oynx to paint 2 layers on my staff. It created a slight glittery effect, then I added a very light layer of shiney/glittery brown to add some “worn out” dimensions.
I then sprayed gold spray paint on a rag and wiped it on the staff to add some more color and a worn out affect.

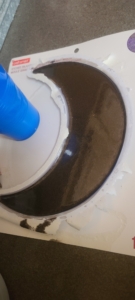
Step 11 – Cutting out a cresent moon shape for staff / scythe
I used a very large bowl to make a crescent moon shape, and cut it out on 1.5in thick cardboard. I then added expanding foam the same way I did on the mask, using my hands to mold it around my moon shape. I allowed that a day to dry, then cut it down to make it flatter. Once I was happy with the shape and look, I added 2 layers of plaster of paris.
I then was able to sand that down until I achieved the look that I was going for. This took a while to get everything smooth and even, so be patient.
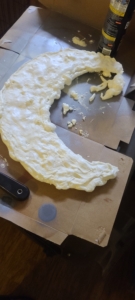
This process failed as well, and the moon was too heavy 🙁 We wound up using the 3D Printer to print the Scythe. It held up for the entire con up until getting in the car!
Step 12 – Painting the pieces for the staff / scythe ; Putting it together!
I did the same thing and used a metallic oynx to paint 2 layers, added more of the brown in spots, then wiped on the gold for dimensions.
I had to use more heavy paper/cardboard to make the other pieces on his staff. I couldnt find many reference pictures, as google did not have many 🙁
So use your imagination and do the best you can!
Step 13 – Belt and Skirt
I used the same fabric as the Duster for the skirt.
To make the belt buckle we also used a 3D Printer and printed the entire piece.
I then hand-painted the piece and used heavy duty velcro to attach to the stretch belt.
Step 14 – Adding more fabric layers to the costume base
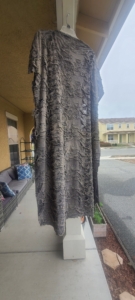
I purchased a mummy costume on Amazon that had some decent reviews. The sizing was way off, but the costume was well made and looked good!
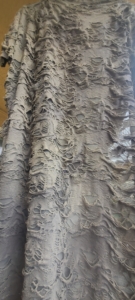
I added a ton of gauze to add more dimension and add a little more to the costume to make it look like Khonshu. I spray painted the gauze with the same colors from the staff and crescent moon, to make them look old and worn-out. Get creative!
Step 15 – Attaching the Resin Moon to the costume
I used one of the “bandage colored belts” to attach the moon around the costume and buckle in the back. I then draped some of the bandages to hide the belt and add more worn-out look to the top.
FINALE!
Try it on and see if you need to add anything in any other areas!
If you follow this tutorial, tag me on instagramn so I can see it!! 🙂 (@animesector)
Estimated Cost: $90.00
Estimated Time to Complete Project: 11 hours
Your estimated cost may differ if you do not already own all the tools needed to complete this project

